H.O. scale
layout
Scenery Tips & Tricks
.
Make it from paper
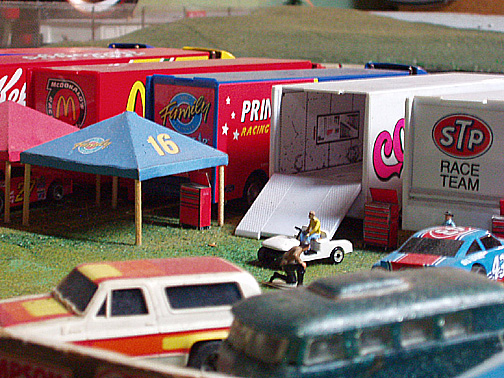
EZ up Tents, Roll-away
Toolboxes, and Tractor interior from paper
For
adding those fine touches to your
layout scenery, all you need is a computer, paper, some balsa wood, and
a roll
of clear packing tape.
As
most of my details are geared
towards a “race track”, the given patterns here are things you’d need
for a
raceway. However, you are not limited… you can put ‘food’ on the picnic
table,
pictures on walls (actually, make the whole wall), special signs,
building roof
shingles or siding, etc… whatever. I’ve even made custom Tractor /
Trailers for
my layout using the following techniques.
Start
with a drawing or pattern. I
like working in .BMP format… MS Paint. It is easier to change colors
and cut
& paste the finer details (like changing tool arrangements in a
tool box
for a different look).
You
should also have a good art program
like Photo Shop (‘PS Elements’ is good and a lot cheaper than some full
programs). The main reason for this is to help ‘resize’ your drawings.
You
can’t just shrink them; you will need to mess with the resolution to
get the
best product. You will need some knowledge & practice at this.
Once
your picture is resized and
printed, cover the whole pic with clear packing tape. This will protect
it.
Depending on what you’re doing, (especially larger items, like the side
of a
truck or exterior walls) you can print your pic out on ‘sticker’ paper…
cover
with tape, cut, peal & stick.
For
small, boxy items (toolbox),
cut a block of balsa wood to the size you need and glue your picture
around it
using Elmers glue.
Check
out some of my detail items…
Tents
Tool
Box
Out
house
Signs - Coming soon
Other
patterns
From:
John Peckham / Greenbrier
Raceway,
N.Y.